

How To Send In Scuf For Repair
In sure cases, a developer may wish to ship emails to an application's users direct from the server, like a welcome message or an account setup link. Nodemailer, a zero-dependency Node.js module, makes it easy to send emails from a server by abstracting away some of the complexities that ascend when connecting an application to an email service.
In this tutorial, we'll encompass how to configure an email address for Nodemailer, transport emails from inside of an application, attach files to an email, add fields for CC and BCC, and finally, add CSS and HTML styling to an electronic mail template.
To follow along with this article, you'll need:
- Node.js v6.0.0 or a more contempo version installed globally on your automobile
- npm installed globally on your machine
- Bones knowledge of Node.js and JavaScript
If yous wish to follow forth, y'all can view the code for this demo in my GitHub repo. Let'south get started!
Configuring an email address for Nodemailer
If you don't already have an email address you'd similar to utilize to follow along, offset past setting up a new ane. You lot tin can apply any electronic mail service, all the same, if you lot're using a Gmail account, there are some important steps you'll need to follow to configure your business relationship.
Gmail configuration
By default, Gmail prevents bots from accessing emails hosted on Google servers. Gmail runs several checks to ensure that every e-mail account is accessed past a recognized user at a recognized location.
If your Gmail account has 2FA ready upward, you may be unable to follow forth. You'll either need to disable 2FA or create a new account that has 2FA disabled.
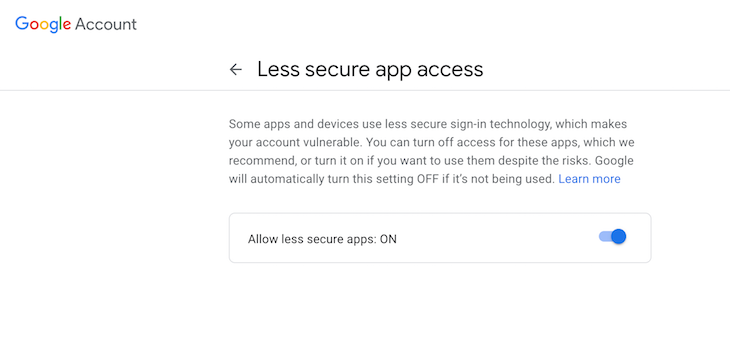
On the screen in the paradigm below, allow less secure apps to admission your Gmail business relationship past toggling the button ON.
Setting up the Node.js server
Now that our electronic mail account is fix correctly, let's beginning writing our code.
First, create a new directory. I called mine fassstmail:
mkdir fassstmail cd fassstmail
In the fassstmail directory, create a new Node.js project:
npm init -y
Next, we'll install Express Handlebars, a templating engine that allows the states to create HTML email templates:
npm i nodemailer-express-handlebars nodemailer
Creating an email template
Now that we've installed the required dependencies, let'due south ready a template to send emails.
In the root of your projection, create a folder called views. Within, create a file chosen electronic mail.handlebars, which will hold the HTML code and styles for our emails.
Handlebars is a templating language, then we can add variables to our HTML, then substitute the variables for the values we want in our final email. In Handlebars, variables are structured with two opening and endmost brackets surrounding the variable text, as in {{variable}} .
In the email.handlebars file, let's create an HTML template for a uncomplicated welcome e-mail:
// email.handlebars <!DOCTYPE html> <html> <head> <meta charset="utf-8"> <meta http-equiv="x-ua-compatible" content="ie=edge"> <championship>Welcome E-mail</title> </head> <body> <h2>Hello {{name}}! </h2> <p>We're glad to have you on lath at {{company}}. </p> </body> </html> In the HTML template above, nosotros accept two variables, {{proper noun}} and {{company}}. Later, we'll learn how to replace the variables in this template with actual values.
Sending an email in Nodemailer
Now that nosotros have our email template fix, permit'southward create an entry file. Create a file called server.js at the root of your fassstmail project. In server.js, add together the following code, which will trigger sending an e-mail:
const hbs = crave('nodemailer-express-handlebars') const nodemailer = require('nodemailer') const path = crave('path') // initialize nodemailer var transporter = nodemailer.createTransport( { service: 'gmail', auth:{ user: '[email protected]', pass: 'password_for_your_email_address' } } ); // point to the template folder const handlebarOptions = { viewEngine: { partialsDir: path.resolve('./views/'), defaultLayout: fake, }, viewPath: path.resolve('./views/'), }; // use a template file with nodemailer transporter.employ('compile', hbs(handlebarOptions)) var mailOptions = { from: '"Adebola" <[e-mail protected]>', // sender address to: '[electronic mail protected]', // listing of receivers subject: 'Welcome!', template: 'email', // the name of the template file i.e email.handlebars context:{ name: "Adebola", // replace {{name}} with Adebola visitor: 'My Company' // supplant {{company}} with My Visitor } }; // trigger the sending of the E-mail transporter.sendMail(mailOptions, function(error, info){ if(mistake){ return console.log(fault); } console.log('Message sent: ' + info.response); }); In the mailOptions object, template refers to the template file we want to employ with Nodemailer. In our instance, we desire to use the email.handlebars file. The context object holds the actual values we would like to use in place of the variables in our Handlebar template file.
I'll supervene upon the variable {{proper noun}} with Adebola and the variable {{company}} with My Company.
Finally, to trigger sending an e-mail, call the transporter.sendMail part and pass information technology to the mailOptions object.
To exam your lawmaking, run the command node server.js in your terminal. Y'all should get a response that reads "message sent". You lot should come across our final email in your inbox!

And that'due south it! You've successfully sent an email using Nodemailer. You can follow the steps outlined above to send other types of emails, and yous can even use Nodemailer to notify yourself if something goes wrong on your server.
At present, let'southward learn how to add attachments to our emails.
Adding attachments to your email
In the root of your project, create a folder called attachments, which volition contain the files nosotros would like to add as attachments to our e-mail. I'grand going to add an prototype chosen moving-picture show-1.jpeg by calculation it to the attachments folder.
Next, add together the post-obit line to the mailOptions object.
var mailOptions = { ..., attachments: [{ filename: "moving-picture show-i.jpeg", path: "./attachments/pic-1.jpeg" }], } In the mailOptions object, attachments takes an array, meaning you can attach whatsoever type of file to the email you're sending. At present, when we send the email, the image is fastened.

To attach other types of files to your email, like PDFs or documents, simply follow the same process.
Calculation CC and BCC to your email template
Allow's add together fields for CC and BCC to forward your email to multiple email addresses at once. Add the following lawmaking to your mailOptions object:
var mailOptions = { ..., cc: '[email protected]', bcc: '[email protected]' } In the epitome below, you can meet there is a CC field with a second email address:

Calculation styles to your email template
Yous tin can add styles to your emails in the same way you lot would add styles to an HTML file. In the <caput> cake in your email.handlebars file, create a fashion cake where you can add all of your desired styles:
<style> h2 { color: #c4c4c4; } </style> I added a header to my email that appears in a light grey color. I'll use this field to transport a personalized bulletin, every bit seen in the image below:

Conclusion
Now, you lot take all of the tools yous need to go started creating and sending emails with Nodemailer and Node.js.
Nodemailer is an splendid tool that makes it easy to send emails from an application securely. In this tutorial, we learned how to make our own email template in Nodemailer, add attachments, and add custom styling. You tin follow this process any time you lot need to communicate with the users of your application.
200'south but  Monitor failed and slow network requests in production
Deploying a Node-based web app or website is the easy role. Making certain your Node instance continues to serve resources to your app is where things go tougher. If yous're interested in ensuring requests to the backend or third party services are successful, endeavour LogRocket.  https://logrocket.com/signup/
LogRocket is like a DVR for web and mobile apps, recording literally everything that happens while a user interacts with your app. Instead of guessing why problems happen, you can aggregate and written report on problematic network requests to chop-chop sympathise the root cause.
LogRocket instruments your app to record baseline functioning timings such as page load time, fourth dimension to showtime byte, slow network requests, and likewise logs Redux, NgRx, and Vuex actions/state. Start monitoring for free.

Source: https://blog.logrocket.com/send-emails-nodejs-nodemailer/
Posted by: johnsonhouncest.blogspot.com
0 Response to "How To Send In Scuf For Repair"
Post a Comment